Each week, Stacy Fischer of Visual Venturing sponsors the After-Before Friday Forum which provides anyone wishing to participate to exchange ideas about the creative power of post-processing. There is always something new going on and I encourage you to check out the submissions by the other participants here.
My submission this week is dedicated to several readers who offered some helpful suggestions to the ABFriday post last week and also in Week 28. I have incorporated those suggestions into the image from last week and that image now has a new look. All work was done with Photoshop CC. I’ll be interested in hearing reactions to the changes.
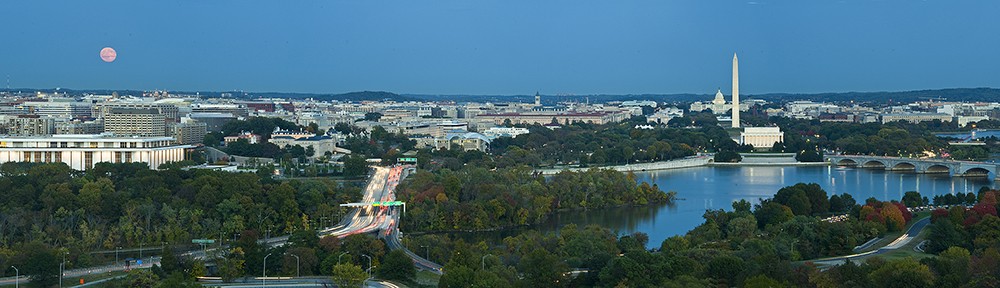
First, as a reminder, here is the starting point for the revisions. The image below was the “Final Image” in last week’s post.
 Starting Image, Uncropped
Last week I asked readers about the cropping decisions on this image and I received a number of ideas, all involving removing a portion of the sky with some of those also suggesting taking a bit off the sides. One person suggested a 1X1 format, similar to the typical Instagram default size. That seemed like the most radical change and that variation is shown below.

Cropped to 1 X 1 Format
Those with excellent memory will recall that two weeks ago (ABFriday Week 28) a reader asked how the “ripped border” effect on the Week 27 image was accomplished. (That post can be found here.) I didn’t recall (5 years is a long time) but said I would attempt to find out.. After 2 weeks of fruitless searching, Janice Foreman came to my rescue with a “how-to” guide that she had found. The technique was similar enough that I was able to add a few tweaks and produce something that was pretty close to the original ripped border effect. For those who are interested, the guide Janice found can be located here.
I should note that using this tool will require some experimentation because the effect varies according to the size of the starting image. The image size used for this demonstration was 2800 X 2800 pixels at 300 ppi.
To begin, one needs to add a white border around the image. One way to do this is the following:
> Use Image->Canvas Size which opens a small dialog window (see below);

Canvas Enlargement Steps
>Choose Percent (red arrow) for both Width and Height and enter a number greater than 100 in the boxes for Width and Height (blue arrows). Make sure the Canvas extension color is white (yellow arrow);
>Click OK and a white border should appear.
> Using the Rectangular Marquee tool (feather set at 0 px), select an area just inside the image border;
> Click Select->Inverse. The result should look something like the screen capture below

Detail of Selection Area
>Click on Filter->Filter Gallery and a full screen dialog window will open. The controls are found in the upper right corner (see detail image below) and the image will appear in a large Preview section on the left (not shown).

Filter Gallery Adjustment Panel
>Select Distort->Glass from the list of effects (red arrows)
>Select Frosted as the Texture (blue arrow)
>Adjust the other controls to your taste and the effect will be shown in the Preview Window. In this case, Distortion is set at 11, Smoothness at 3, and Scaling at 131%.
>Click OK and it’s done. The Final Image is shown below.

Ripped Border Effect
The result is close, but not identical, to the effect achieved in the Week 28 image. However, the Photoshop Filter Gallery offers a wealth of options and is a great place to play during a rainy afternoon.
Once again, thanks to Stacy and all of the participants in this week’s Forum. I hope you will check out the others at Visual Venturing ABFriday Week 30.

On my opinion it is best decision about cropping. And I like the frosted border. Now the Piece of Art is finalized and ready to be framed.
LikeLike
Thanks very much. I’m also thinking that the square crop is better. I appreciate your visit and taking time to comment.
LikeLiked by 1 person
I’m not a big fan of the ripped border effect but I do like the crop at 1×1! And I like what you did with the image. I’ll have to go back to see how that was achieved!
LikeLike
Thanks, Emilio. That’s why they call them “special” effects. But’ it’s always fun to experiment.
LikeLike
The 1×1 crop is really good and thank you for the ‘how to’ on the ripped border, Robin. I was one of a few who asked for it. No, not quite the same but as you say with that as a starting point a bit of fiddling and playing can produce all sorts of interesting results. Thank you again.
LikeLike
Thanks for your comments. I’m glad you saw the post, because your request was what motivated me to search for the technique. Thanks go to Janice as well, for giving me the tip about the starting point.
LikeLike
The cropping has worked well and the addition of the boarder has really lets the picture dissolve into away at the edges. Although I am not sure it would be possible with conventional printing I would loved to see this printed with the texture as it would look really interesting.
LikeLike
Thanks, Ben. I haven’t printed one of these yet, I think it would need some sort of textured paper to take advantage of the metal stamp effect. I haven’t come across the right kind just yet, but I’m looking.
LikeLike
Pingback: Morocco Relived – Into the Sahara 2 | Beyond Purgatory