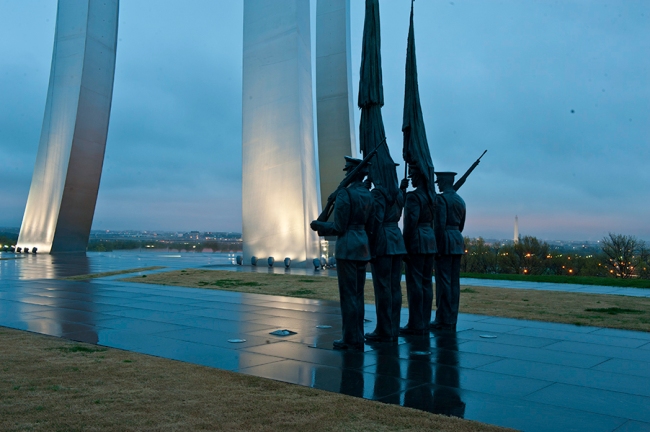
After-Before Friday Week 2

The ABFriday Forum, launched by Stacy Fischer, of VisualVenturing,  is open to anyone who wants to illustrate the difference between two versions of an image, one being the final result and the second being the original or starting point.  The idea is to exchange ideas about a photographer’s conceptual vision and how she or he made it happen.   The “After” image in my submission this week is shown below.

Image

Dawn, US Air Force Memorial (After post-processing)

This image of the US Air Force Memorial was taken just before in a light rain in April 2011.  Although there was a heavy cloud cover, the sky was much brighter than the statues in the foreground. I adjusted the exposure for the sky, knowing that I could bring out the needed detail in the statues of the soldiers during post-processing.  (Technical Data: Nikon D700 with 24-70 mm f/2.8 lens; exposed 1.6 sec. @ f/16, ISO 400)  The image resulting from that exposure is shown below


Image

Dawn, US Air Force Memorial (Raw Image)


All of the changes were made in Adobe Photoshop CS6.  When I made the original image my plan was to include the Washington Monument in the composition.  But when I brought it up on the monitor, the Monument’s small size seemed to make it a distraction more than a helpful component.  I decided to direct the viewer’s eyes to the two most important subjects: the four statues in the foreground and the base of the Memorial spires just beyond.


Image

Dawn, US Air Force Memorial (Raw Image Cropped)

Once the crop was made, there was a little bit of clean-up involved.  It’s hard to see in this size, but the sensor of the D700 was in need of a cleaning and there were also a few small drops on the skylight filter.  I used a combination of the Clone Tool and the Healing Brush to remove these artifacts.

Image

 Dawn, US Air Force Memorial (Foreground grass darkened)

The next step was to darken the grass in the foreground.  This is a subtle step in controlling where the viewer will look, but I didn’t want the drab lawn in the foreground to be a distraction.  The above image shows the effect of a Curves adjustment layer (blend mode: luminosity) with a mask blocking the effect everywhere except in the foreground grass.


Image

The last step lightened the statues of the four soldiers.  I used a selection tool to isolate them from the rest of the image and applied another Curves adjustment layer (blend mode: luminosity) to reveal detail in the statues.

One of the questions asked by a reader last week was how long it took to make these changes. In this case, I would estimate I spent 30-45 minutes, with most of the time involving the clean-up activity.

Thanks again to Stacy Fischer for organizing this effort.  Please check out her post and the submissions from other photographers.

Paris Countdown: Five Days!

It won’t be long now.  My camera gear is ready to go, the research is done, and our travel documents have been checked and checked again.  But there is still time for another retrospective of previous visits.

Paris is often called the City of Light or “La Ville-Lumière.” The origin of this term has several competing theories, but we photographers know that the real reason is what happens after sunset.  The Parisians know how to illuminate their city.   According to Elaine Sciolino, in a 2006 New York Times article, considerable resources are dedicated to lighting the monuments, buildings, and bridges of Paris.  There is an entire lighting division in City Hall responsible for choosing the design, style, color, intensity, and timing of the lighting for  some 300 structures within the city’s 40 square miles.

Image

Twilight, Institut de France from the Right Bank

The image above shows the Institut de France with the Pont des Arts, a pedestrian bridge, on the left.  The bridge links the Institut with the central court of the Louvre Museum.

Image

Twilight, Pont Neuf, from the Right Bank

Pont Neuf, a short walk away, is another example.  This was taken about five minutes earlier than the image of the Institut de France  This is the oldest bridge across the Seine today.  Construction started in the 16th century and it was the first bridge not lined with houses on both sides.

 Image

 Sacre-Coeur at Night

 A few days later, I was on the rooftop terrace of Printemps (64 Blvd. Haussman),  and captured this scene of the Sacre-Coeur Basilica located on Montmarte Hill.

If all goes well, I should find a few more opportunities to photograph the La Nuit en Paris.   And, as in my previous post on Paris, I welcome any suggestions for subjects and/or locations. I’ve had several interesting suggestions already.  Just use the Comments option to send them.

After-Before Friday

Stacy Fischer, of VisualVenturing, has launched an invitational series “After-Before Friday” in which participants may submit two versions of an image, one being the final result and the second being the original or starting point.  The idea is to exchange ideas about a photographer’s conceptual vision and how she or he made it happen.  Stacy’s weekly post will display a series of submitted image pairs, each with a brief description by the photographer.   Each submitter also has the option to provide a link back to their own blog which would provide more details on the post-processing techniques used to achieve the final image.

After_Before 01

Marine Corps Memorial, After Post-Processing

I really liked this idea and submitted these two images (After above) to the first running of this series.   The subject is the Marine Corps Memorial just around sunset on September 4, 2009.   A storm front was approaching from the southeast and I had a difficult lighting situation: a sky with dark clouds and bright open sections, an overall low light level, and a very dark main subject.  The dynamic range exceeded the capability of the sensor to duplicate what the eye could see.  My plan was to expose so that there would be at least some detail across the entire range and the actual scene could be restored during post-processing. After_Before 02

Marine Corps Memorial, Original RAW File

The “Before” image above is the image after a few tweaks (clarity and vibrance) in Adobe Camera Raw, but is essentially the way it looked immediately after download.    From here all changes were made in Photoshop, although there are other ways this could be accomplished.


After_Before 03Result after Step 1

Step 1:  A Curves adjustment layer (blend mode: luminosity) was used to darken the image as shown above.  A layer mask was added to retain the original brightness of the gold leaf insignia and lettering on the base of the statue.

After_Before 04A

Result after Step 2

Step 2:  A Curves adjustment layer (blend mode: normal) was used to provide additional darkness to the clouds. A mask was added to block any change to the statue, foreground and trees.

After_Before 05

Result after Step 3

Step 3:  A selection tool was used to isolate the flag, then I employed another Curves adjustment layer (blend mode: screen) to brighten the flag.

After_Before 06Result after Step 4

Step 4:  A selection tool was used to isolate the green signs in lower left, and then I added another Curves adjustment layer (blend mode: normal) to darken the signs.

After_Before 07

Result after Step 5

Step 5:  I used a selection tool with a very soft feather to create an oval mask centered on the statue and extending out toward the corners. Then a Curves adjustment layer (blend mode: multiply) to slightly darken the corners.  It is pretty subtle, especially at this size and the objective is to avoid making it noticeable.  But the purpose is to help bring the viewer’s attention to the center of the image.

After_Before 01Result after Step 6

Those who have worked in a “wet” darkroom recognize that these techniques (Steps 1-5) are what used to be called dodging and burning.  At this point, the digital darkroom made it possible to consider a creative issue: should the bystanders and small dog on the right be allowed to remain in this scene?  This is not anything I would have considered in the old days of film and chemicals because I (and most photographers) lacked the skill and resources.

In this case, the decision was to remove them because they tended to detract from the composition rather than strengthen it. This is particularly noticeable when the image is printed in a large size.

Most of my images don’t involve nearly this much change from the original.  But even with all of the work, anyone who was there would agree that this is pretty close to what it looked like at the moment of the exposure (except for the tragic disappearance of the bystanders and dog).

My thanks to Stacy Fisher for her efforts in organizing the Before-After Friday series. I am looking forward to the submissions of others and learning from their experiences.


Paris Countdown!

In two weeks, I will be heading back to Paris and I am beside myself with excitement.  I have been carefully planning possible locations and times to capture photographic images, but let’s get real.  There are other reasons to be there.  And it is entirely likely that my blog postings will cease entirely during the 15-day trip as we use the too-short time available to concentrate fully on whatever experiences we may encounter.  But, at the moment, this begins the final count-down, a retrospective of past trips to help set the mood.

Image

The Louvre Pyramid at Twilight

I like to learn a little bit about subjects that I photograph and there is a lot to know about this place.  In 1981 President François Mitterrand launched a major expansion of the Louvre, a project headed by I.M. Pei and including Yann Weymouth as Chief of Design.  The project was completed in 1989, featuring glass manufactured with Fontainbleau white sand to attain a perfectly clear white color supported by a metal structure designed by Navtec, a U.S. firm known for its rigging on America’s Cup sailboats.    (Technical Data: Nikon D200 with 18-20 0mm f/3.5 lens set at 18 mm; exposure: 1/40th sec. @ f/3.5, EV at -1.0 at ISO 400)

Image

The Eiffel Tower at Night

And no trip to Paris can be complete without a photo of the Eiffel Tower.  Named for its designer Gustave Eiffel, it was completed in 1889 to mark the centennial of the French Revolution and served as the entrance arch for the 1889 World’s Fair. Its completion also ended the short reign of the Washington Monument as the tallest building in the world. The unusual blue lighting and circle of 12 illuminated stars in this image were a temporary celebration of France assuming the Presidency of the European Union in the summer of 2008 for a six-month term.

I didn’t have a tripod, but there is a wide ledge on the balcony of the Place du Trocadero that is perfect for a platform.  (Technical Data: Photographed from the Place du Trocadero with a Nikon D200 with 18-20 0mm f/3.5 lens set at 29mm; exposure 4 sec. @f/4.0, ISO 500)

Image

Inside the Musee d’Orsay

The Musee d’Orsay originally was a railway station built in 1900 for the Universal Exposition.  It served this function for 39 years and was used for other purposes until 1970 when it was about to be destroyed.  The Ministry of Culture blocked the plan, directing that it be preserved and transformed into an art museum to bridge the gap between the Louvre and contemporary art of the Georges Pompidou Centre.  It was opened in 1986.

I found an upper balcony overlooking what must have been the original train shed and made three handheld exposures. It was one of my first attempts at Photomerge.  (Technical Data: Nikon D700 with 24-70 mm f/2.8 lens set at 24 mm; exposure: 1/80th sec. @ f/4.5, at ISO 400)

Image

Phone Call, Paris 2008

“Street Photography” is not my strong suit but sometimes one gets lucky.  In this case, I noticed the coincidence of the color of the young woman’s purse and the display in the store window.  She very kindly remained engrossed in a lengthy cell phone conversation giving me plenty of time to get my act together. (Technical Data: Nikon D-200 with 18-20 0mm f/3.5 lens set at 80mm; exposure 1/125th @f/5.6, ISO 400)

If anyone has a favorite photo location in Paris, please let me know.  You might see it in a future post.

Washington Monument Opens to the Public

I could feel the anticipation as I turned the corner.  For the first time in almost three years, the day had finally come—the structure was once again open to everyone.  The previous day had been reserved for the official re-opening: the ceremonial event, the media, the VIPs, contest winners, and well-deserved recognition of the individual whose generous donation had made it all possible.  But now came the first of many days when anyone could ride an elevator to the best view in Washington, DC.

Morning, Washington Monument, May 13, 2014

      Morning, Washington Monument, May 13, 2014

Nikon D800E with 24-70 mm f/2.8 lens, lens at 70mm, exposure: 1/250th sec @ f/16

The Washington Monument was the tallest structure in the world when it was completed in 1884, and is still the world’s tallest stone structure.  You can find more information about the monument in my post of April 22, 2014 but today’s story is about the view. I had no idea what to expect.   I feared that the number of people (about 100) and the short time before the next tour (about 30 minutes) would make it hard to get any image, let alone something decent.  And with the sun still relatively low in the east there would be no chance for anything in that direction. But, as it turns out, I shouldn’t have worried.  The elevator will hold about 15-20 passengers, there are eight viewing windows, and you can stay up there as long as you want.  And everyone was quite polite, not hogging the windows and waiting patiently for their turn. Details on scoring your own ride on that elevator are at the end of this post.

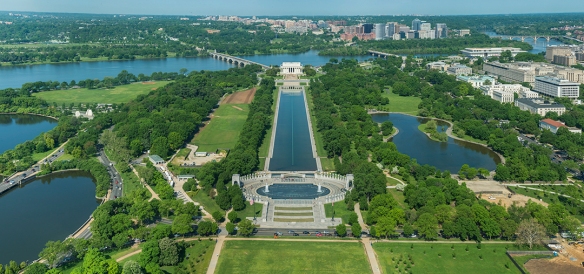
Looking West, World War II Memorial, Reflecting Pool, Lincoln Memorial

      Looking West, World War II Memorial, Reflecting Pool, Lincoln Memorial

(Technical Data: Nikon D800E with 24-70 mm f/2.8 lens, lens at 70mm, exposure: 1/250th sec @ f/16, EV at -0.67; eleven images combined with Photomerge in Photoshop CC)

The excitement of the other visitors as they looked out the windows was palpable. And when I stepped forward to get my first glimpse, the view was even more dramatic than I had expected. My first thought: “I’ll never be able to do justice to this view.”

World War II Memorial, Reflecting Pool, and Lincoln Memorial

         World War II Memorial, Reflecting Pool, and Lincoln Memorial

(Technical Data: Nikon D800E with 24-70 mm f/2.8 lens, lens at 70mm, exposure: 1/250th sec @ f/16, EV at -0.67; three images combined with Photomerge in Photoshop CC)

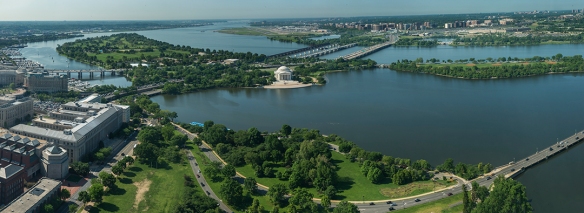
To the south, the sweeping vista incorporated the Jefferson Memorial, the entire Tidal Basin, Reagan National Airport and the full breadth of the Potomac River.  The departing and arriving aircraft seemed like tiny mosquitos.

Looking South, Jefferson Memorial, Tidal Basin and Beyond

                     Looking South, Jefferson Memorial, Tidal Basin and Beyond

(Technical Data: Nikon D800E with 24-70 mm f/2.8 lens, lens at 60mm, exposure: 1/250th sec @ f/16, EV at -0.67; eighteen images combined with Photomerge in Photoshop CC)

I quickly realized that I would have come back again and I am already thinking about ideas for the next time.  Although the first morning tour is well after sunrise, it is open until after sunset.  Without a doubt, there will be some future posts on this incredible place. A ranger told me they plan on adding tours in a few months that will allow you to walk up the stairs.  If you are able to make such a climb (it takes about an hour), it would be well worth it.  There are nearly 200 commemorative stones donated by all 50 states, organizations and foreign governments, some of them quite elaborate.

There are two ways to get your own admission ticket to the top of the Monument.  You can take a chance and just show up early in the morning the day you want to visit.  The ticket window opens at 8:30 and will distribute a limited number of tickets for that day until the supply runs out.  Or you can order tickets in advance.  Go to this link for further details about orders by phone and a link for placing online orders.

The ticket window is located on the backside of the Washington Memorial Lodge, a small white stone building located on 15th Street, directly east of the Monument.  If you have “Will Call” tickets ordered online, you can pick them up inside the Lodge, which opens at 8:30 AM.

It was a dark and Stormy Night…

Wind, clouds, and nightfall.  Not the usual descriptors for perfect photographic conditions, but in the right circumstances,   these conditions can produce dramatic images.  As suggested in my last post, the Navy and Merchant Marine Memorial seemed to have potential for nighttime photography.  And so, here are a few examples of my first attempts.

Image

Sunset plus 15 Minutes (Note Washington Monument under leading gull)

Continue reading